
Creating and activating an NBI account is the first and most important step when applying for an NBI Clearance online. Many people face problems during account activation, email verification or reactivating old accounts.
This guide explains Activate NBI Account Online. You will learn what an NBI account is, how to activate it online, how to reactivate an old or deactivated account and what to do if you do not receive the activation email.
What Is an NBI Account?
An NBI account is your personal online profile on the official NBI Clearance website. It allows you to:
-
Apply for NBI Clearance online.
-
Book an NBI appointment.
-
Pay NBI fees online.
-
Update personal information.
-
Track NBI application status.
Without an activated NBI account you cannot proceed with the NBI clearance application.
Why Is NBI Account Activation Important?
NBI account activation is required to confirm your identity and email address. It ensures that:
-
Your personal data is secure.
-
Only you can access your NBI application.
-
Notifications and updates are sent to your email.
This step is mandatory for all new and returning applicants.
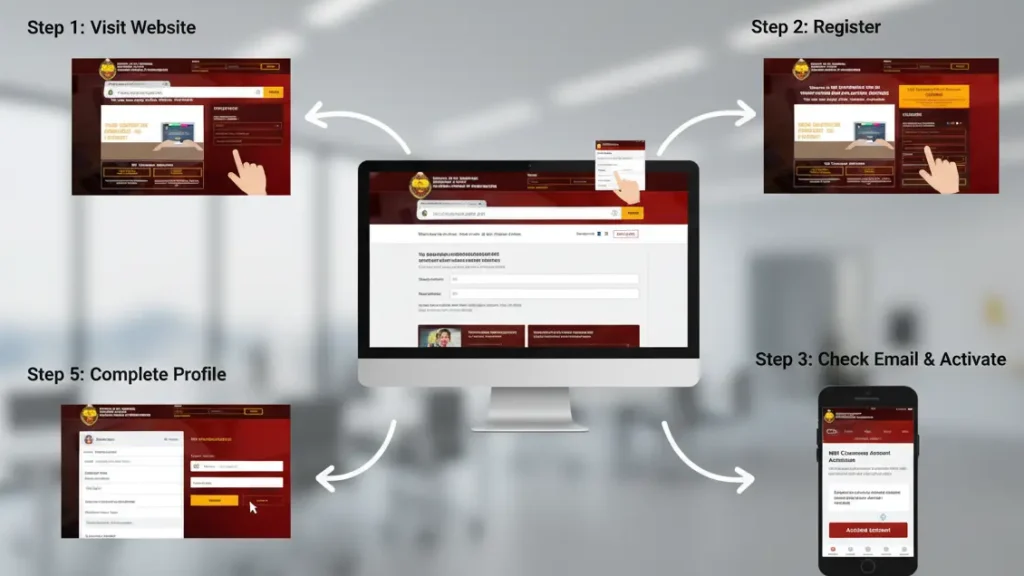
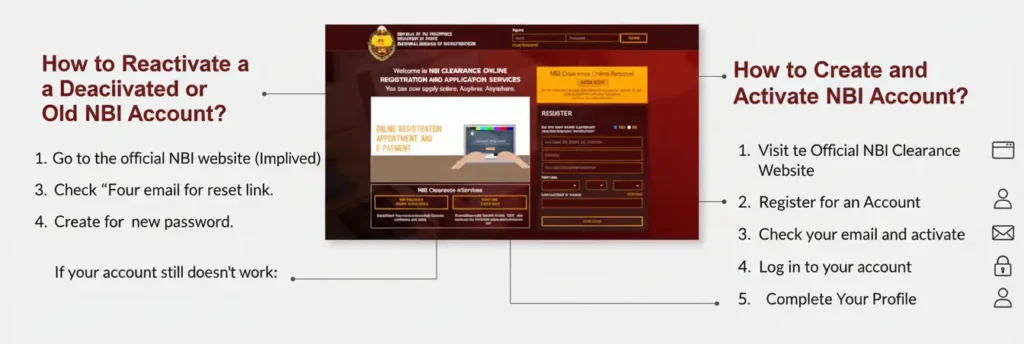
How to Create and Activate NBI Account?
Follow these steps to create and activate your NBI account properly:
Step 1: Visit the Official NBI Clearance Website
Go to the official portal: https://clearance.nbi.gov.ph.
Step 2: Register for an Account
If you are a first-time user click on “Register” and choose “Yes”.
Fill out the form with the following details:
-
Full name
-
Date of birth
-
Gender
-
Civil status
-
Valid email address
-
Password
Step 3: Check your email and activate
After you finish registering open your email inbox. Look for an email from NBI Clearance Online. It has an activation link inside.
-
Click the link to activate your account.
-
Once activated you will be redirected to the NBI website login page.
-
You can now sign in using your email and password.
If you don’t see the email check the Spam, Junk or Promotions folders sometimes it goes there.
Step 4: Log in to your account
- Go back to https://clearance.nbi.gov.ph and click Sign In.
- Enter your registered email and password.
- Once logged in you’ll see your dashboard where you can apply for clearance or schedule an appointment.
You can also check the Organizational Structure of NBI Philippines easily and get information about it.
Step 5: Complete Your Profile
Before you can apply for an NBI Clearance make sure your profile is complete.
Go to “Edit Information” and fill in:
-
Full address
-
Mobile number
-
Citizenship
-
Birthplace
How to Reactivate a Deactivated or Old NBI Account?
If you created an NBI account years ago and cannot log in your account may be inactive.
Follow These Steps:
-
Go to the NBI login page.
-
Click Forgot Password.
-
Enter your registered email address.
-
Reset your password using the email link.
-
Log in again to reactivate your account.
If your email is no longer accessible, you may need to create a new account.
Didn’t Receive the NBI Activation Email?
If you did not receive the activation email, do not worry. This is a common issue.
Possible Reasons:
-
Incorrect email address entered during registration.
-
Email went to spam or junk folder.
-
Temporary system delay.
-
Weak internet connection.
What You Should Do:
-
Recheck your email spelling.
-
Search your inbox for “NBI Clearance”.
-
Wait for a few minutes and refresh.
-
Use the Resend Activation Email option.
-
Try registering again if needed.
Common Mistakes to Avoid When Activating Your NBI Account
Avoid these common errors to prevent delays or rejection.
-
Using an invalid or inactive email address.
-
Entering incorrect personal information.
-
Creating multiple accounts with the same details.
-
Ignoring the activation email.
-
Using fake or temporary emails.
These mistakes can cause account suspension or application issues.
Frequently Asked Questions
Q1: How long does it take to activate my NBI account?
Most of the time your account activates right after you click the verification link in your email. Sometimes it can take a few minutes before the system updates.
Q2: What happens if I don’t activate my account?
If you don’t activate your NBI account, you won’t be able to log in or apply for an NBI Clearance.
Q3: Can I change my email after registration?
No you can’t. For security reasons the NBI system does not allow you to change your registered email.
Q4: Can I use the same NBI account for renewal?
Yes You can use your activated account to renew your clearance, schedule new appointments and check your application status anytime.
Q5: Is there a fee for activating an NBI account?
No activating your account is completely free. You only pay once you start your NBI Clearance application or renewal process.
Conclusion
Activating your NBI account is an important first step in getting or renewing your NBI Clearance. Always use a real and active email, click the activation link right away and make sure all your personal details are correct and updated.

informational